|
|||||||||
|
|||||||||
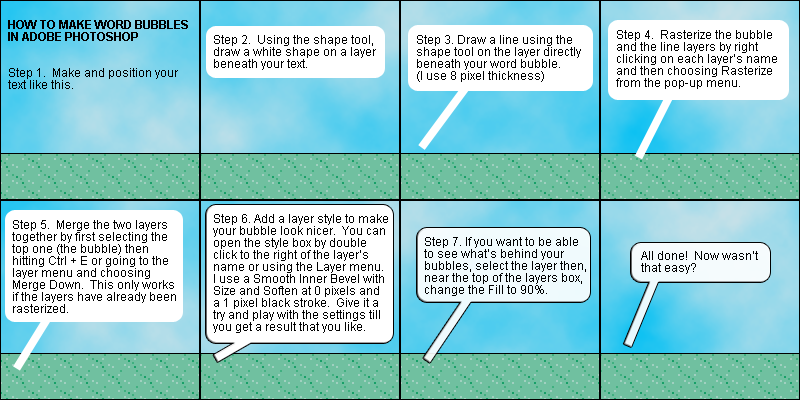
| Josiah's Sprite Comic Guide Part 6: Building Effective Speech Bubbles Once you've got that script written and positioned the text in your comic you still need a speech bubble, or something similar, to separate the text from the background and make it easy to read. Just using plain text on the background can work for a few things, like sound effects or titles, at times but you really don't want to do that for your main dialogue. It looks sloppy and is extremely difficult, if not impossible, to read on anything other than a solid single color background. Step 1: Prepare the Text No matter which program you're using, you need to pick an appropriate size and font for your text. Pick something that looks nice and is easy to read. For most of the text in Pebble Version, I use Arial size 12. Be careful not to overdue it with fancy fonts. Sure they may look cool but they're usually not the easiest thing to read so don't use them for your primary font, save them for occasional special things. In Photoshop you can also adjust the spacing between the lines of text. It defaults to auto, which is generally fine unless you use some special symbols like é, which can give your lines a very inconsistent spacing. If you need or want to manually set the line spacing, try a size that's the same size as your font or something that's just slightly larger (say size 14 spacing for a size 12 font). Step 2: Decide on a Position Hopefully you already left adequate empty space in your panels for the text. Even so, if you have multiple people speaking in one panel you'll need to arrange each block of text so it'll fit nicely in the space. An annoyingly common mistake you want to avoid is screwing up the order of the text in a panel. Regardless of the position of your characters, it's almost always best to put whatever line is said first at the top of the panel. Whatever is said second will go beneath that, then the third, etc. If you don't do it this way you'll likely confuse your readers and they'll have to jump from speech bubble to speech bubble, trying to figure out what order they should be read in. Step 3: Creating Simple Speech Bubbles in MS Paint The best way to demonstrate the process of making a speech bubble is with a tutorial image so take a look. Step 4: Creating Simple Speech Bubbles in Photoshop For Photoshop users, follow the steps in this image. Step 5: A Few Final Tips There's lots of different styles and shapes you can use for speech bubbles. You may even want to use different shapes for different types of text (for example, a bubbly bubble for thoughts or a plain box for narration). So play around and find something that you like and that isn't all that hard to make (speech bubbles aren't something you really want to spend a ton of time on). Conclusion: Making decent looking speech bubbles is a pretty quick and easy process once you know how to do it. The main thing to pay attention to is the positioning. You never want your readers to be unsure of who is speaking or of what order the characters are speaking in. Once you've got you speech bubbles in place head on to Josiah's Sprite Comic Guide Part 7: Creating Simple Special Effects. |
|||||||||
|
|||||||||
| Pokemon and all related images and trademarks are copyrighted by Nintendo, one of my favorite games companies who would certainly never waste their time by trying to sue me. Especially since I'm protected under the Fair Use Rule of the United States Copyright Act of 1976. Aside from that the actual site content is copyrighted by me, Josiah Lebowitz 2003. | |||||||||