|
Josiah's Sprite Comic Guide
Part 3: Creating Great Backgrounds
Chances are, one of the first things you'll be doing when you sit down to make a sprite comic is the background. Or maybe not, you might want to create the text or lay out your sprites first. But for now we'll work on backgrounds.
Note: If you're using screen captures for you backgrounds, instead of making your own, you can probably skip over most of the stuff in this section. Speaking of screen captures, using them is easier than making your own backgrounds and usually faster too. As an added bonus, it looks good too. However, screen captures can be a bit limiting if you want to have areas that didn't appear in the original game or even just mix up the old areas a bit to better fit the needs of your comic.
Step 1: Do Some Quick Planning
Before you make the background for your comic you've got to make sure you know what background(s) you'll need. So, even if you don't write out the exact dialogue yet, spend a minute or two planning out what you want to happen in the strip. At very least you'll need to know where your characters will be in each panel.
Step 2: Adjust Your Layout
This step can change a lot depending on the type of layout you're using. You may not even need it at all. Anyway, depending on where your characters are going to be and what they'll be doing, you may want to tweak your layout a bit to fit.
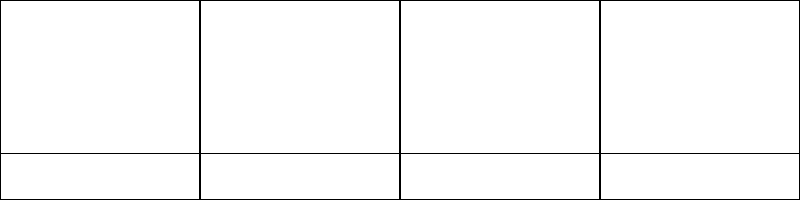
For example, here is one of my normal layouts for Pebble Version.
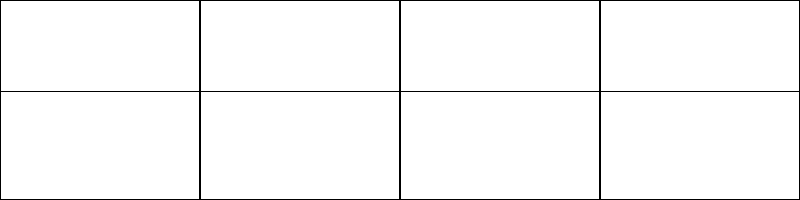
And here's another one. I use this layout when I need more ground (like when the characters are walking up or when there's a big battle going on and I need extra space to show everything).
If you find yourself frequently changing backgrounds you may want to save seperate versions of the ones you use the most.
Step 3: Ground, Walls, and Sky
There are a couple different ways you can go here when creating your own backgrounds. What you do will most likely be at least partially based on what image editing program you're using to make your comic.
If you're working in Paint or something similiar, you'll probably want to stick with basic two color backgrounds. Just pick a color, switch to the paint bucket tool, and click in the appropriate area of your layout. Assuming you have all the lines drawn out to seperate the ground, sky, and panels, that section will fill with your chosen color and you can move on to the next one. This method is quick, easy, and can be done in pretty much any image editor. Also, it's fairly hard to screw up. Just use different colors that make sense considering what they're supposed to represent (for example don't make the sky green, unless of course your comic takes place on some weird planet with a green sky). However, since two color backgrounds are so simple, some people consider comics that use them lazy and amaturish. However, there are some really good comics out there with two color backgrounds. When it comes down to it, if your characters, story, dialogue, humor, and the like are good enough most people won't care if your comic doesn't look quite as good as it could.
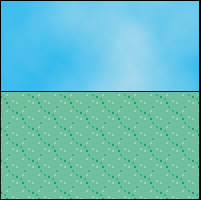
If you've got Photoshop, here's an easy way to make a nice looking sky. First off, choose a nice shade of blue (or whatever color your sky happens to be) and set it as your background color. Next up, pick a color for your clouds, a light gray for a normal day or something darker for a storm, and set it as your foreground color. Now use your favorite selection tool (rectangular marquee, magic wand, etc) and select all the sky areas on your layout. Now go to the Filters menu, then Render, and choose Clouds. If you don't like the way your clouds are spaced across the sky keep hitting Ctrl + F until you get a sky that you like.

Two color backgrounds are all well and good but if you want to take things to the next level you'll need some textures...
Step 4: Getting and Using Textures
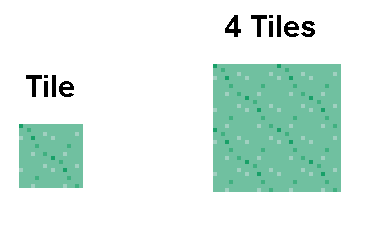
Textures can refer to many things but in sprite based games textures often refer to small tilable blocks that are used to create things like grass, walls, and the like without taking up much space in memory. Anyway, enough with the explantions, here's how it works.
1. Take a screen capture that includes a large area of the texture you want (be it grass, dirt, a floor or wall pattern, etc).
2. Load the screen capture in your image editor and enlarge it if neccessary then zoom in on the area with the texture you want.
3. Now comes the tricky part. You need to break that texture down into the individual tiles that make it up. It helps to have an eye for detail and if you don't have any experience with tilable textures it may take a little while before you get good at. In a nutshell, you need to find the square or rectangle that, when placed next to and/or on top of itself, looks like a single continuous object (with no seams or gaps).
4. Now, you could just save the individual tiles to a sprite sheet and place them in each comic yourself but that's a huge pain. Nice image programs, like Photoshop, will let you define patterns and/or textures and fill areas with them any time to want. For example, in Photoshop first drag a rectangular marquee around the single tile then go to the Edit menu and click on Define Pattern. Name your texture and hit Ok. From now on, if you want to fill an area with that texture just select the empty area where you want it, then go to Edit, then Fill. In the Fill dialogue box set the top drop down box to Pattern then use the drop down box below it to select your pattern and hit ok.
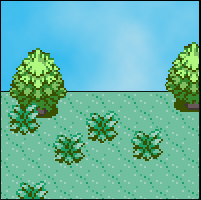
Step 5: Add Your Objects
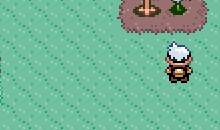
Now you should have a nice empty background.
This is a good start but chances are you're going to want to put some objects on there too. Like trees, bushes, buildings, or whatever. Now that's pretty easy. Simply open the sprite sheet that has the has the sprite(s) you want, use a selection tool to grab the sprite you want and copy/paste (or if you're using a program like Photoshop just drag and drop) the sprite onto your comic. Then move it where you want. (Note: in Paint you'll have to make sure that the background color behind your sprite is set to transparent, there's a couple of buttons for this below the tool bar. You can find more detailed instructions in the next part of the guide.)
One thing to keep in mind is whether you want a particular sprite to go behind or in front of any other sprites. In programs like Photoshop this isn't a big deal since you can always rearrange your layers to change what is and isn't on top. In Paint, however, you don't have that ability so if you want a sprite to be on top something make sure you put the top sprite in after the stuff that's supposed to be below it.
Conclusion:
And there you have it. No matter what image program you're using, making nice looking backgrounds really isn't very hard if you're willing to spend a little time working on them. So start practicing and when you're ready head on to Josiah's Sprite Comic Guide Part 4: Laying Out and Putting Together Your Strip.
|

